Thinking about migrating from Power BI to Sigma? Here are 5 things to consider.
January 14, 2026
Sigma AI App workflow design patterns: a Weekly Update case study
February 7, 2026Intro to Multi-Tenancy in Sigma
Multi-tenancy in Sigma has arrived! Okay, not the applause I was expecting… I know, multi-tenancy might seem like a more benign topic – but it truly is game changing, especially for organizations developing embedded analytics products for their clients.
I could write pages worth of material on tenants, but I am going to keep the focus of this blog post fairly concise. This blog is going to cover what multi-tenants are, how to set them up, how they tie into some other new features of Sigma (Deployment Policies & Source Swap Policies), and some use cases to apply them to.
Let’s dive in!
What does Multi-Tenancy in Sigma mean?
So, you know when you go into your Sigma environment and you access a link such as below?
https://app.sigmacomputing.com/maverick-data-llc/
This link takes me to my Maverick Data Sigma tenant where all the consumers, admins, and explorers in my Sigma environment go to build with or consume data. But now, with multi-tenancy, you can set up multiple different environments from your main Sigma tenant instead of relying on just one environment.
Why is this important?
Think about how a cloud data architect would differentiate data between clients, organizations, use cases, or audience – they would not do it all in one schema. They would break it out between warehouses, schemas, etc. Now, we can do the same thing in Sigma!
So now instead of just accessing Sigma via our main environment I can create sites like the ones below to give different clients their own isolated access, or create separate reporting environments for testing, right in the Sigma Admin console.
https://app.sigmacomputing.com/maverick-data-llc-client-1https://app.sigmacomputing.com/maverick-data-llc-client-2https://app.sigmacomputing.com/maverick-data-llc-client-3-prod
Previously, you’d need to maintain separate Sigma organizations entirely, or build complex user-attribute-based filtering into every single workbook. Multi-tenancy eliminates both of those headaches.
Setting up Multi-Tenancy
First, you need to ensure that Tenants are turned on for your organization. If they are not, you can contact your Sigma sales rep and request that this be turned on. You should see Tenants as an option on the left hand side of your Administration page.

Click on Tenants and in the top right corner you can see the option to Create Tenant. You can input the Tenant name and then the Tenant URL.
Note – the URL name can be differentiated from the Tenant name, but it will be the default.
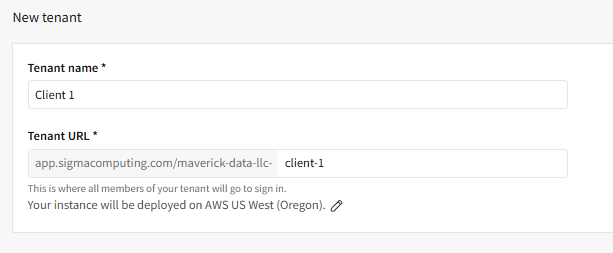
You can also decide what instance your new tenant will be deployed on. Once you have input the required information, click Create at the top right. You’ve now created your first tenant!

Now that we’ve created our list of tenants, go ahead and click on one of the Tenant names. As you can see in the screenshot below, you have the option to Open tenant as admin – let’s click on that.
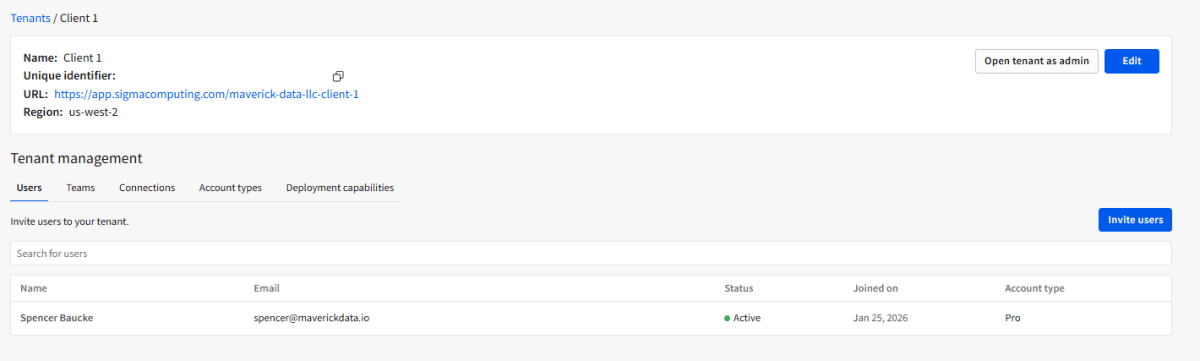
You should find yourself in a brand new Sigma home page in your new Tenant that you just created. Click on your Admin tab and you can see that there are no Connections, Users, or Teams defined here. It’s like starting over with a brand new Sigma environment. You should also notice a Stop Impersonation option at the top. This will return you to your main Sigma Tenant.
Other Features in Tenants
It’s important to note that Deployment Policies and Source Swap Policies are available in your main Sigma tenant as well (not using multi-tenants) – but they are critical to make enterprise adoption of multi-tenants possible.
Source swap policies
Source swap policies are a connection-level configuration that automatically route queries to different databases or schemas based on user attributes. This enables multi-tenant data isolation without creating duplicate workbooks.
Later, when we create Deployment Policies, you can include source swap policies in those Deployment Policies. But first, let’s create a source swap policy.
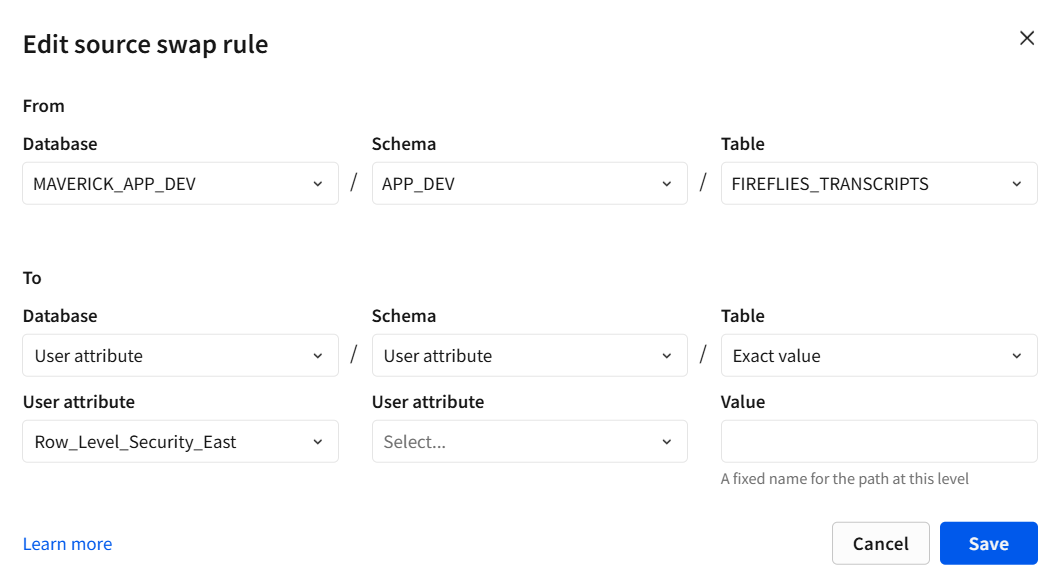
When you create a new Source Swap Policy you are going to be asked for a Policy Name, as well as what data source you are swapping from and what attribute you are swapping to. In the example below, we are switching from a DEV data source to the source specific to Client 1.

Then for that specific attribute value, we assign the Teams whose members will trigger the swap to that particular data source. For example, users in the “Client 1 Team” would have their user attribute set to match “CLIENT_1_DB”, causing their queries to route to that database.
In order to have this source swap policy work, you must ensure that a few things are true:
- All databases must have identical schema structure (same table names, column names)
- The user attribute value must match the actual database name in your CDW
- The connection must have access to ALL databases being swapped to
You can also add source swap rules to a source swap policy that dictates exact locations of the to and from swap taking place at the Database>Schema>Table levels. These can also be substituted in for User Attributes as well.
Deployment policies
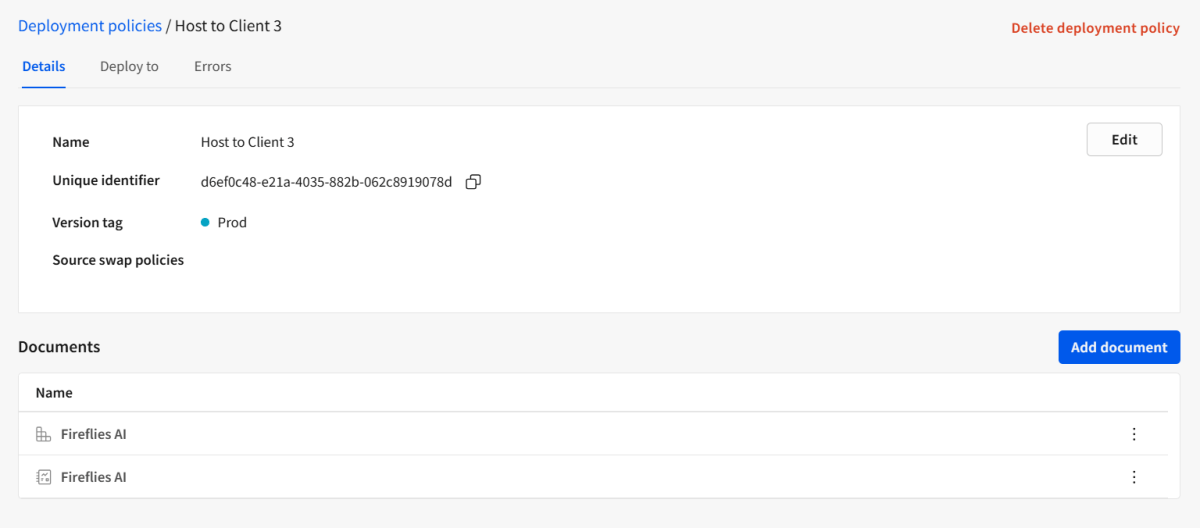
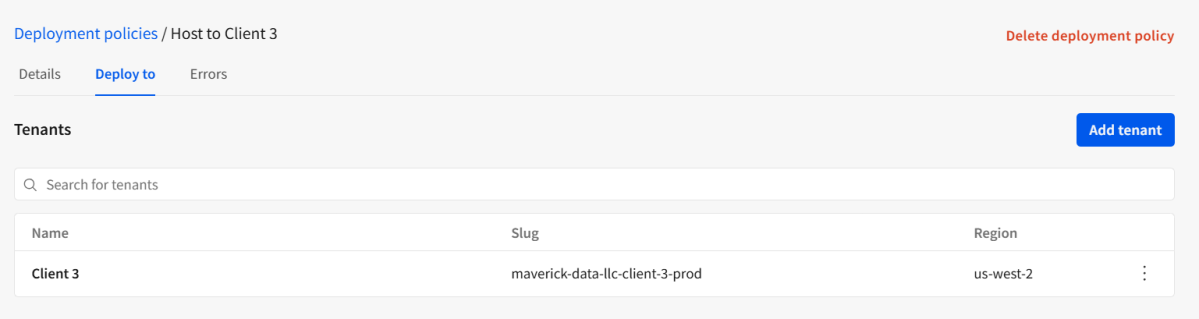
Deployment policies enable the deployment of Sigma content between hosts based upon Version tags associated with each Sigma element. In the example below I have set up a deployment policy to deploy my Fireflies AI Sigma report from the host tenant to my client 3 tenant.
You can also specify a source swap policy that will be enacted when this deployment policy is activated.

In the screenshot below, I’m specifying which tenant to deploy the asset to.
In order to get this Deployment policy to activate, I have tagged our Fireflies AI workbook with the Prod version tag. I then opened my Client 3 tenant and looked at the workspace named Host to Client 3 and the new version of the Fireflies AI.

One important thing to note here – when a workbook is deployed to a child tenant, it maintains the connection to the host tenant’s data source unless a source swap policy is applied.
Summarizing Multi-Tenants and New Features
The multi-tenant capabilities in Sigma are exciting, but can only be maximized when using deployment policies and source swap policies. I have summarized the relationship between the three items below.
| Component | What It Does | Where It Lives |
|---|---|---|
| Tenants | Allows creation of independent Sigma instances for different clients, orgs, or CI/CD phases | Host tenant level |
| Source Swap Policy | Defines FROM/TO mapping of data sources. | Connection level in the host tenant. Can be referenced in Deployment policies |
| Deployment Policy | Controls how workbooks are deployed from host to child tenants based upon version tagging. Can be combined with Source Swap Policies as well. | Workbook level. |
Common Use Cases for Multi-Tenancy
Now that we’ve covered the how, here are a few scenarios where multi-tenancy shines:
- Embedded Analytics: Deploy the same analytical dashboards to dozens of clients, each seeing only their data
- CI/CD Pipelines: Maintain separate DEV, TEST, and PROD tenants with controlled promotion of content between environments
- Self-Service Analytics Environments: Give clients or departments their own tenants to build and experiment without impacting production reporting or other teams’ work
Wrap-Up
Multi-tenancy, deployment policies, and source swap policies form the foundation for enterprise-scale Sigma deployments. Build once, deploy everywhere, with complete data isolation – that’s the game changer.
If you’re embedding Sigma for multiple clients or managing complex environments, this feature set is worth the investment to understand. The setup requires some architectural thinking upfront, but the payoff in operational efficiency is significant.
Contact Us
If you would like to talk to someone at Maverick Data about maximizing your usage of the Sigma platform, please email us at spencer@maverickdata.io for more information!